
Lighting a Craftsman Home in East Sacramento: Gables, Hidden Wiring, and a Boom Lift
The part of a permanent system that decides how it looks is everything you don't see. Here's how an East Sacramento craftsman home was planned, wired and lit.
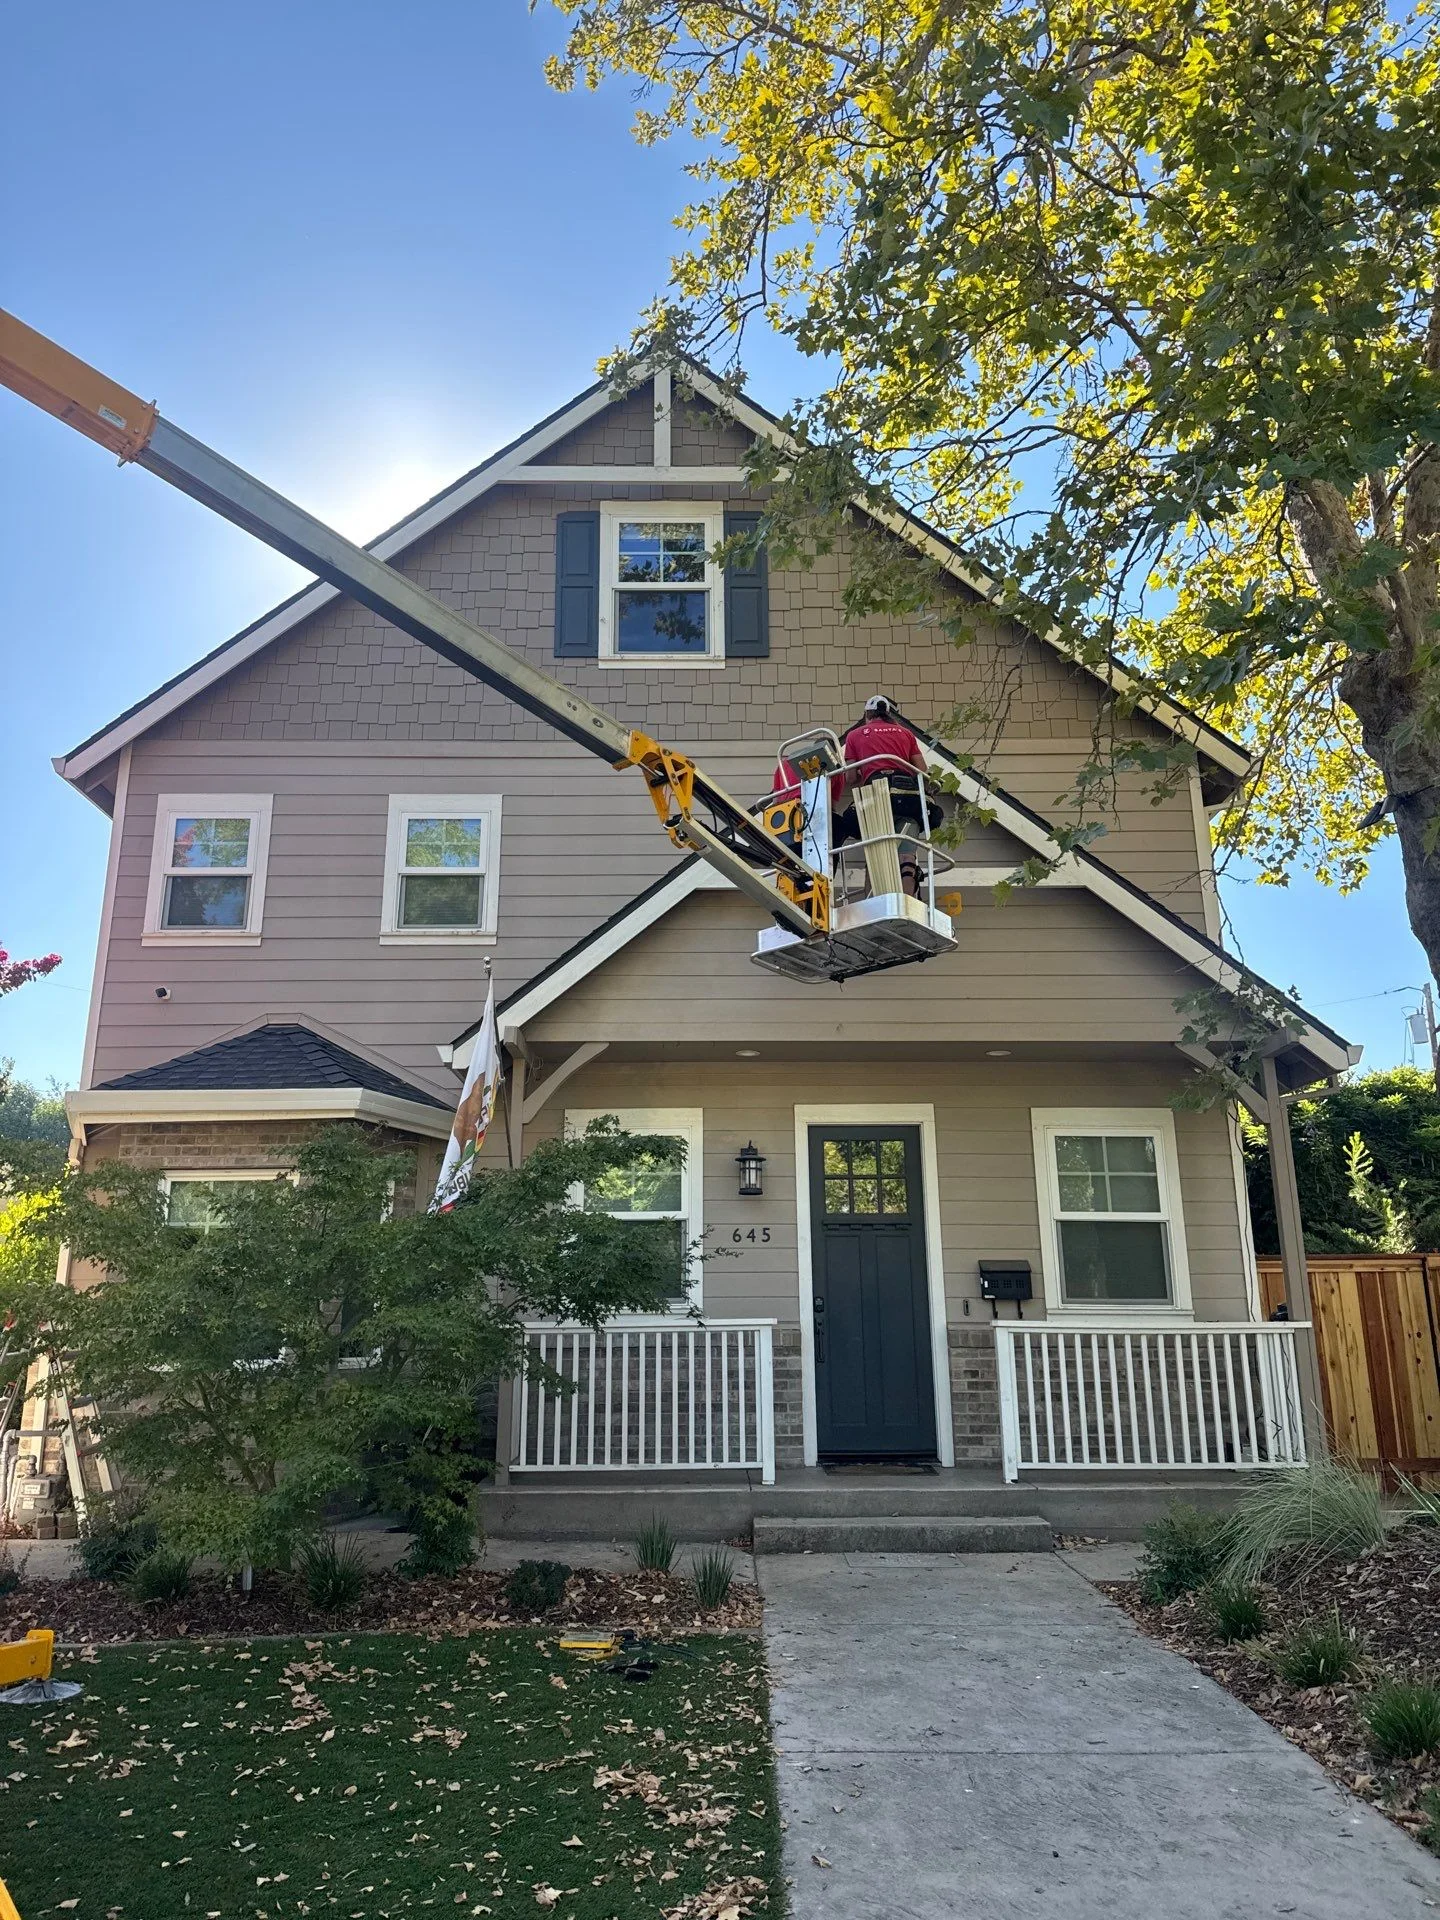
The job: a permanent lighting install on Ryan's two-story craftsman style home in East Sacramento, with a tall shingled front gable, a lower porch gable, white and cream trim, and a mature shade tree overhanging the front of the house. The challenge: light two stacked gables and a stepped side roofline with a clean, trim-matched track, feed the whole system from one hidden control box, and reach a peak too tall and too tree-covered for a standard ladder. The result: a sand colored track that traces every rake and the decorative gable framing, wired from a control box tucked behind the fence, and capable of showing a different color on every pebble.
- The craftsman home in East Sacramento
- Why the track is sand colored
- How power reaches the roofline
- Start at the peaks and work down
- Lighting the architecture, not just the edges
- Why a boom lift made sense here
- Working under a mature shade tree
- What the lit close ups show
- Is permanent lighting right for a craftsman home?
- FAQ
Have a craftsman home with gables and detailed trim?
Free design consultation, transparent pricing, no obligation.
Most people picture the lights when they think about a permanent system. The part that decides whether it looks right, and whether it keeps working for years, is everything you don't see: where the power comes from, how it gets up to the roofline, where each connection sits, and what order the install happens in. Ryan's East Sacramento home is a good example, because our install plan for it was marked right on the photos, and it shows exactly how a system like this is laid out.
Here's how the job came together, from the plan to the boom lift to the lit close ups, based on our on site documentation.
The Craftsman Home in East Sacramento
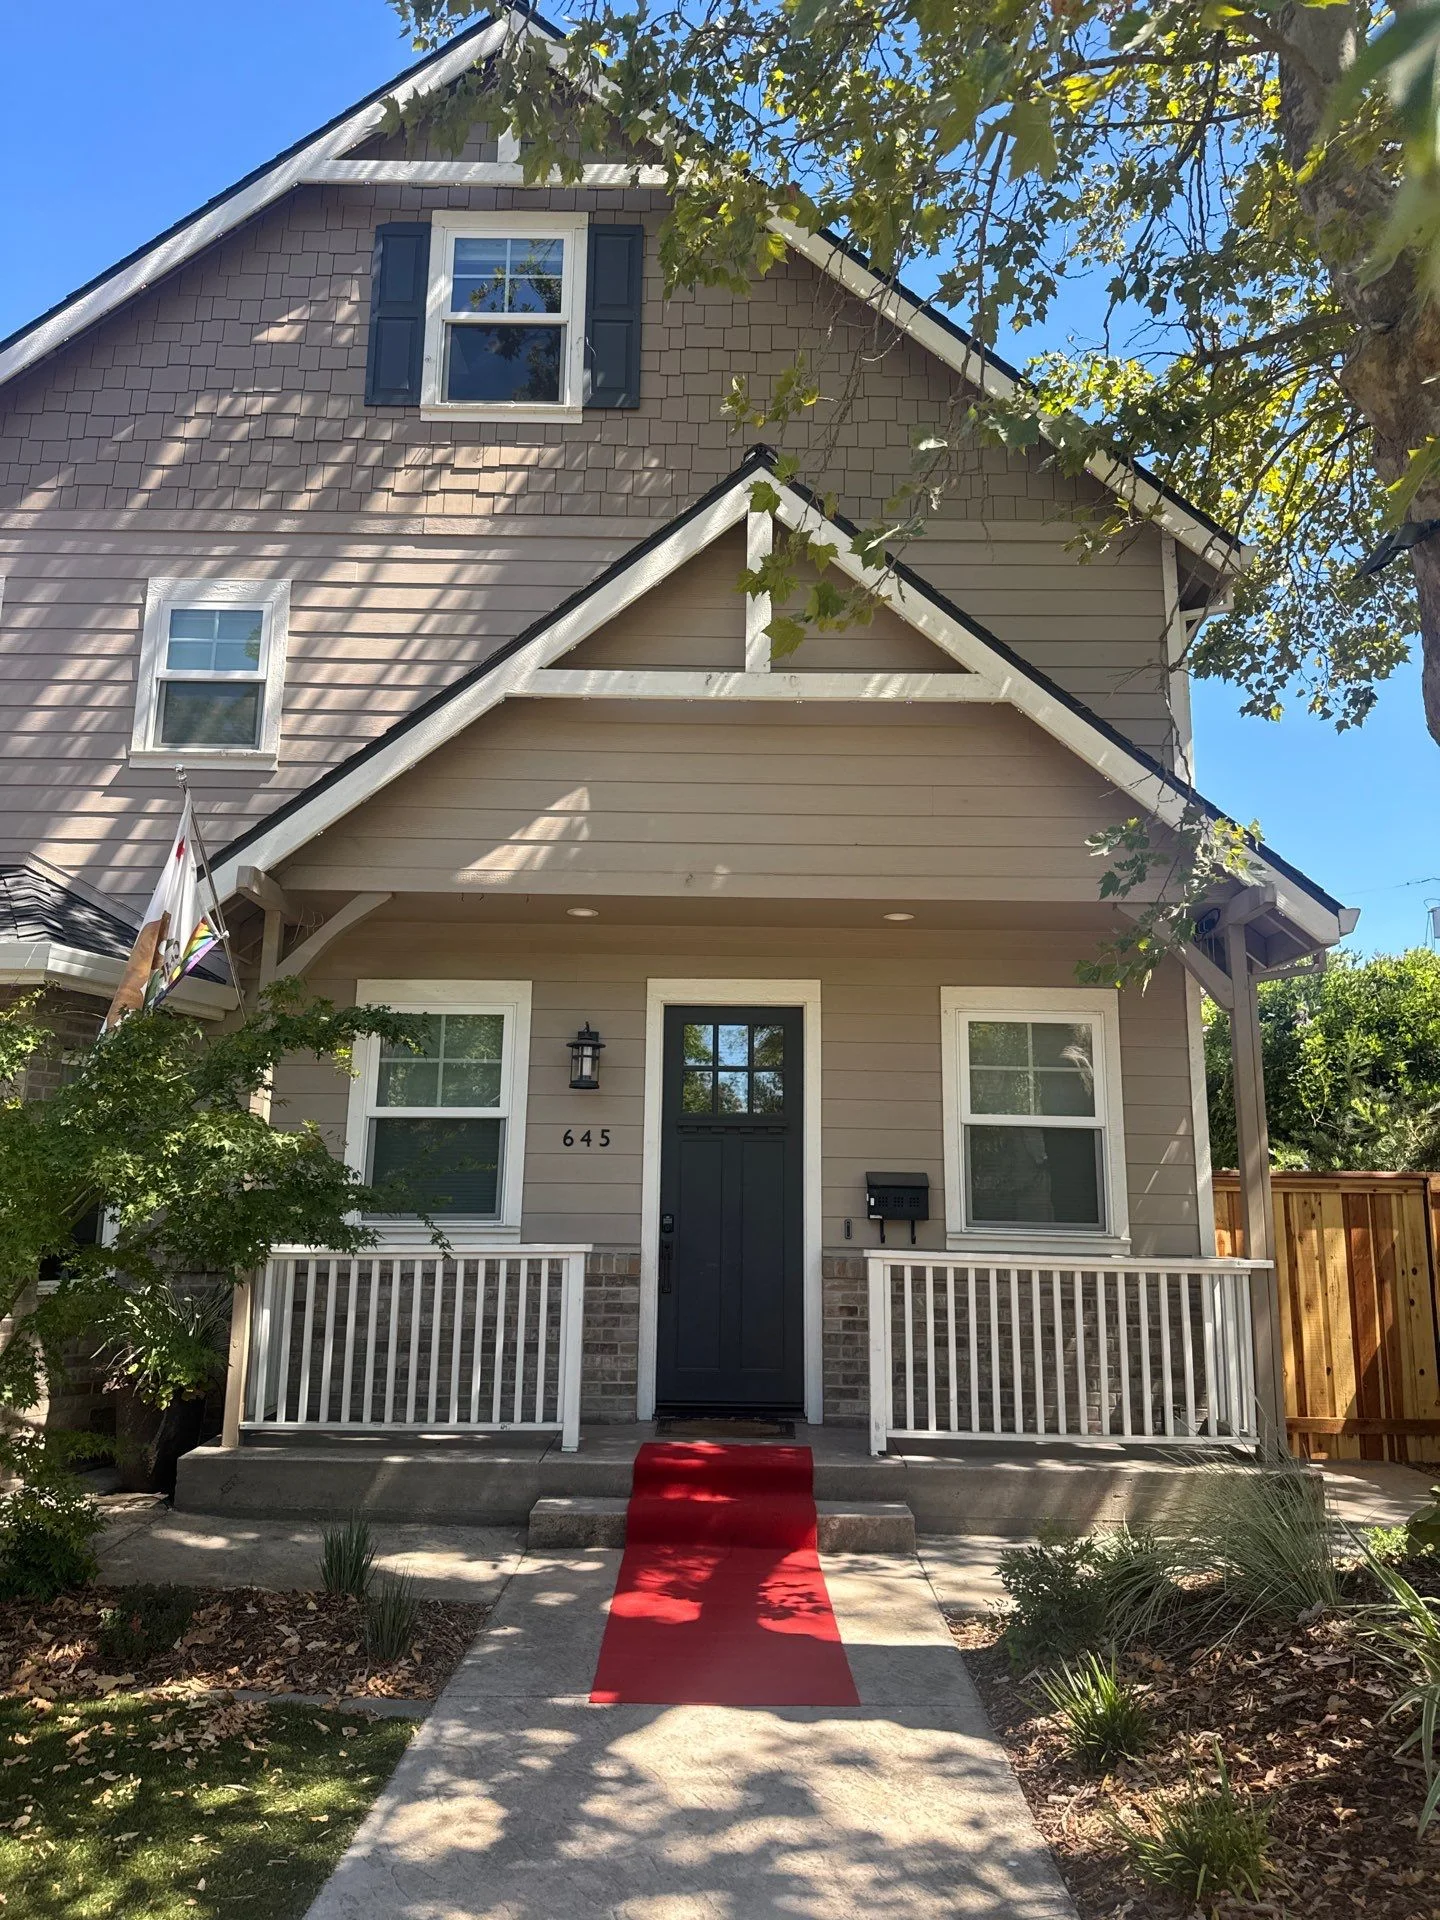
East Sacramento is known for its mature trees and its character homes, and this house fits right in. The front is built around two stacked gables. A tall main gable rises above, covered in shingle style siding, with a window flanked by dark shutters. Below it, a lower gable shelters the front porch, with a decorative crossbar and a vertical post set into the gable face. White trim outlines every edge, and the porch has white railings over a brick base. Around the side, an upper floor bumps out over a row of triangular wooden brackets, and the roofline steps up and down along the way.
That is a lot of architecture to light well. Each of those edges is something the eye already reads as part of the house, which is both the opportunity and the risk. Lights that follow the architecture make a home look more like itself. Lights that ignore it look added on.
| What's on the house | What it meant for the install |
|---|---|
| Tall shingled front gable | A peak too high and too tree covered for a standard ladder |
| Lower porch gable with a decorative crossbar | A second set of rakes plus a horizontal member that could carry its own run |
| White and cream trim on every edge | A light colored track that blends into the trim |
| Upper floor bump out with triangular brackets | A stepped roofline along the side that needed its own planned route |
| Mature shade tree overhanging the front | Limited ladder access and extra care working near branches |
Why the Track Is Sand Colored
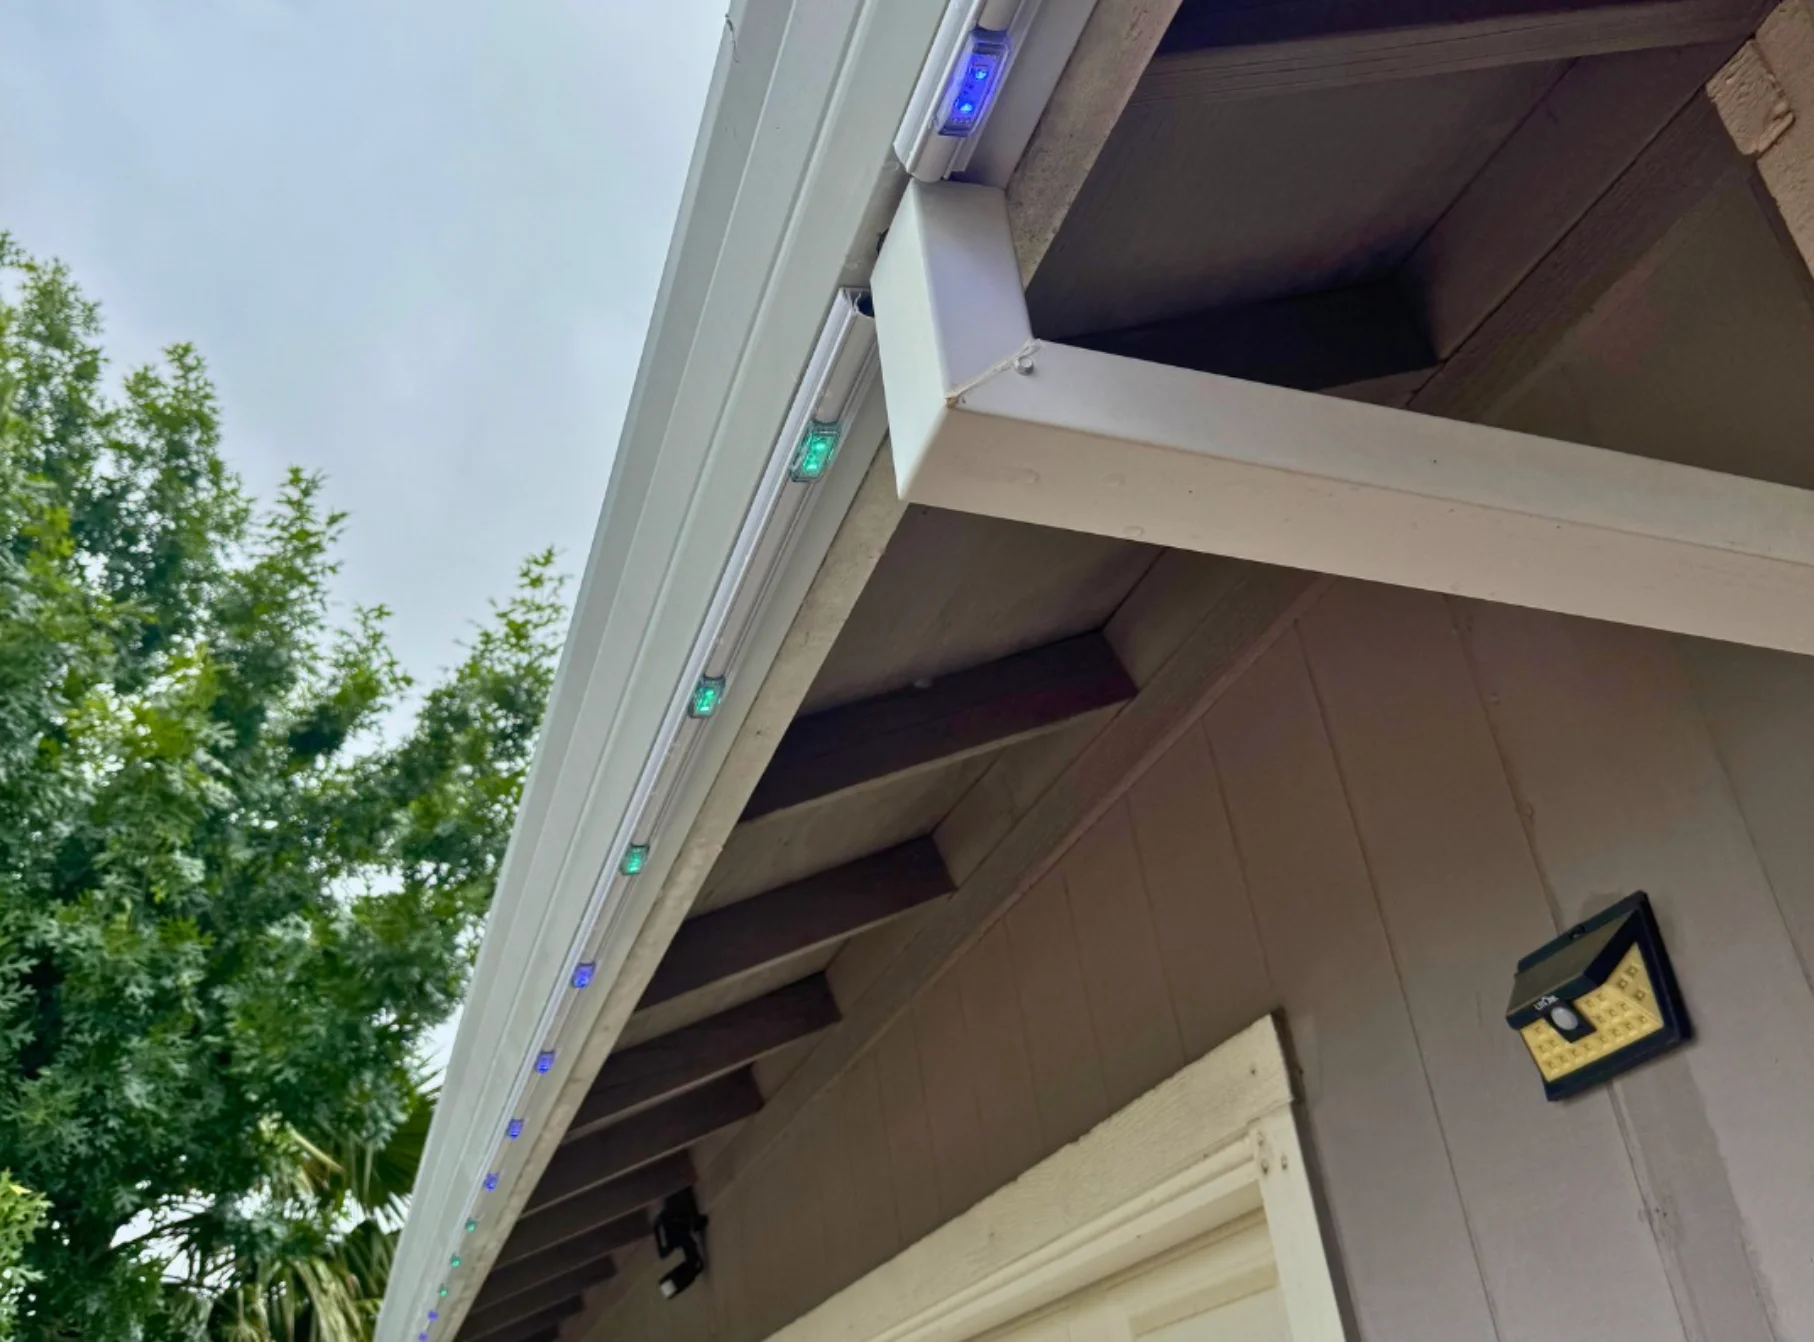
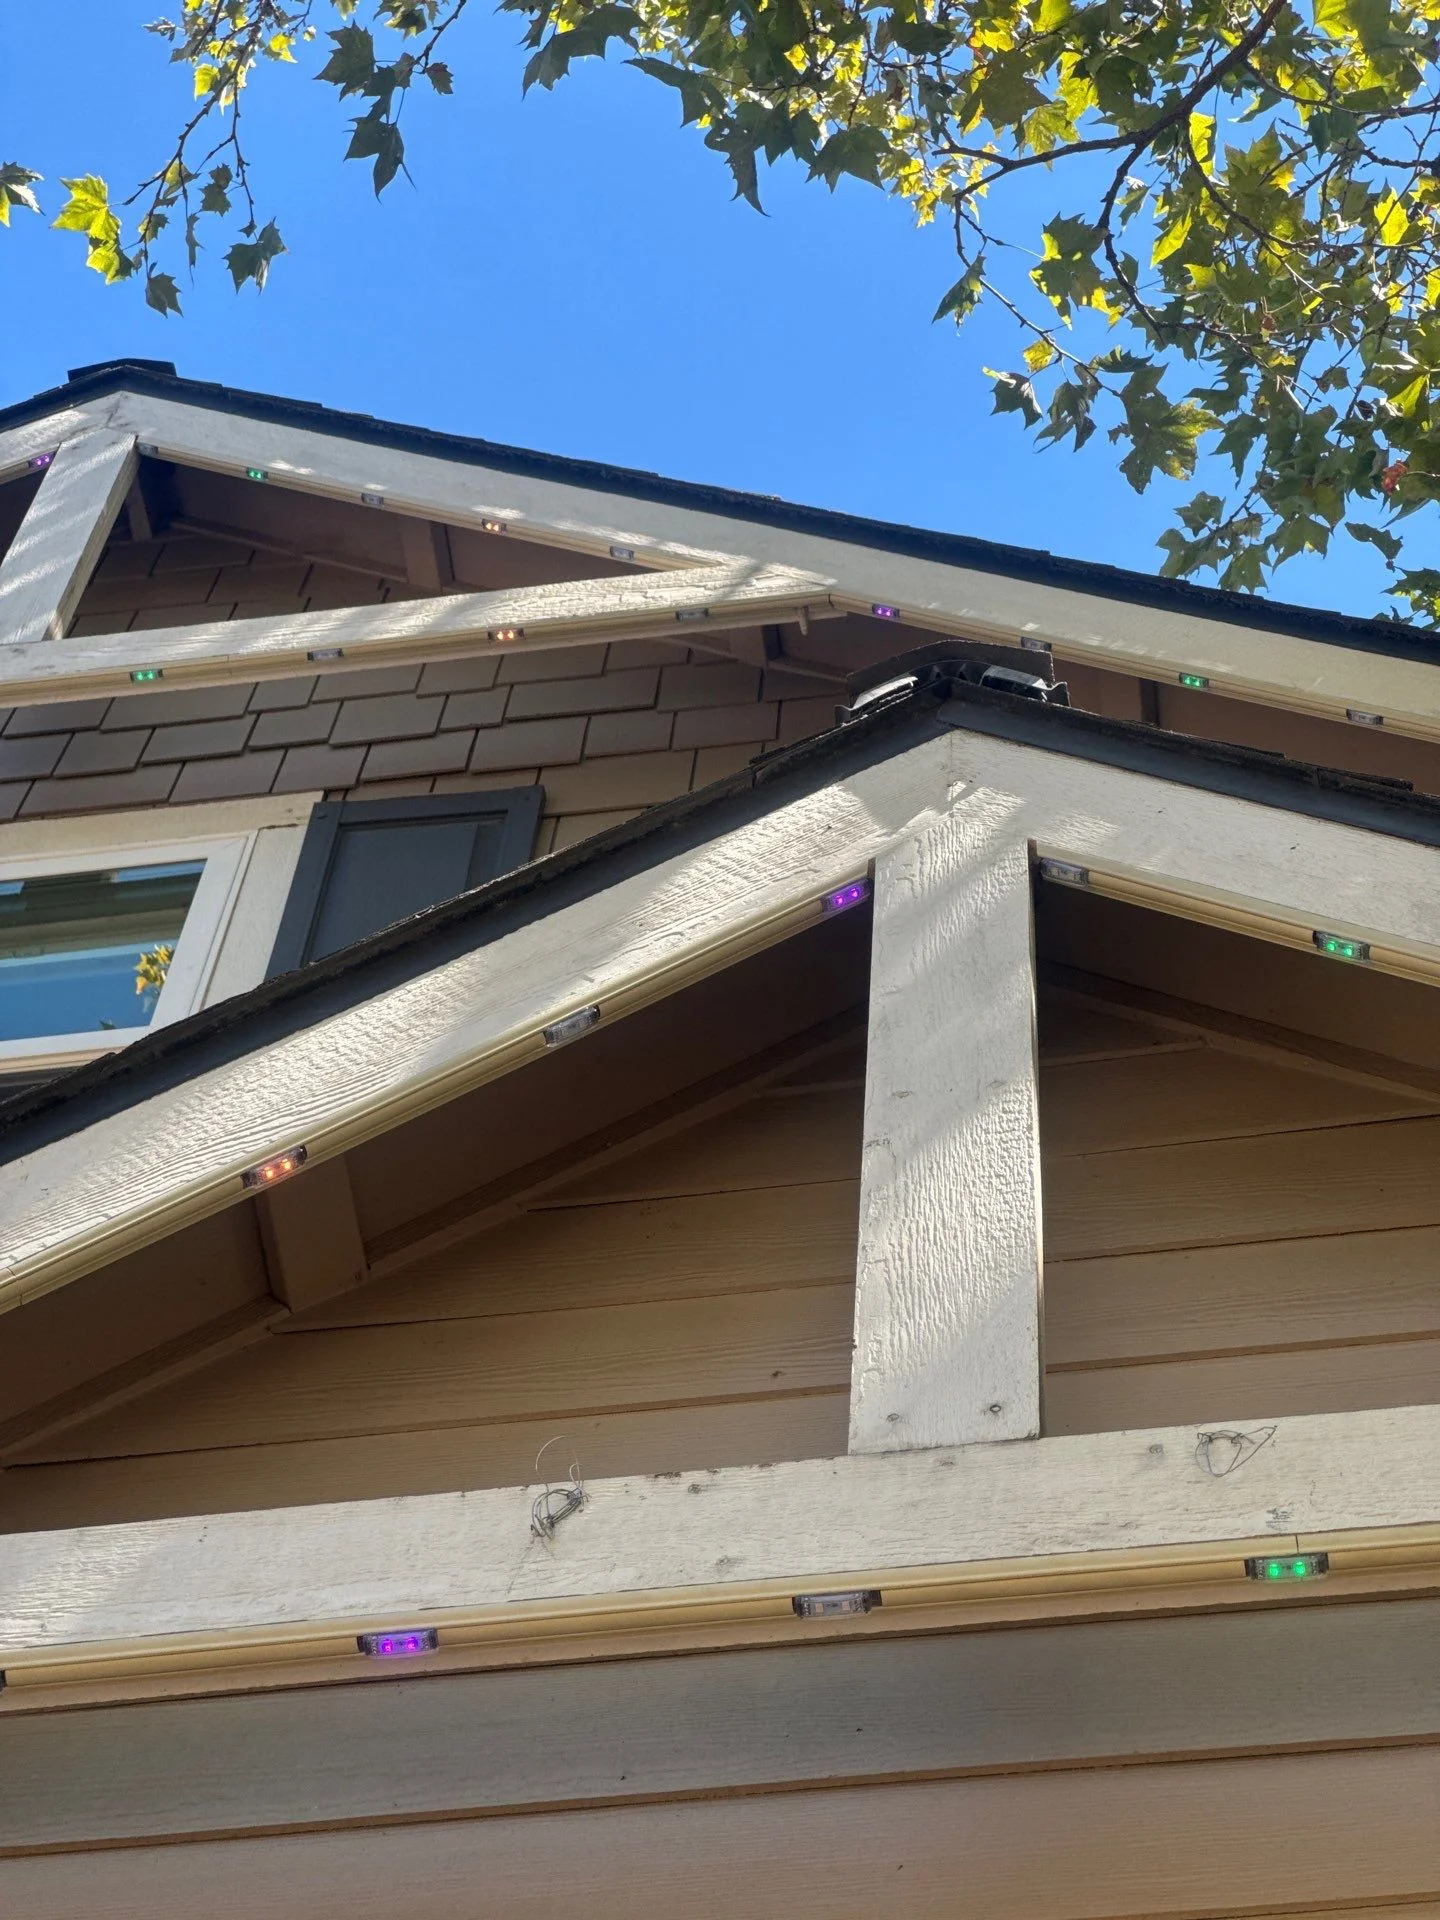
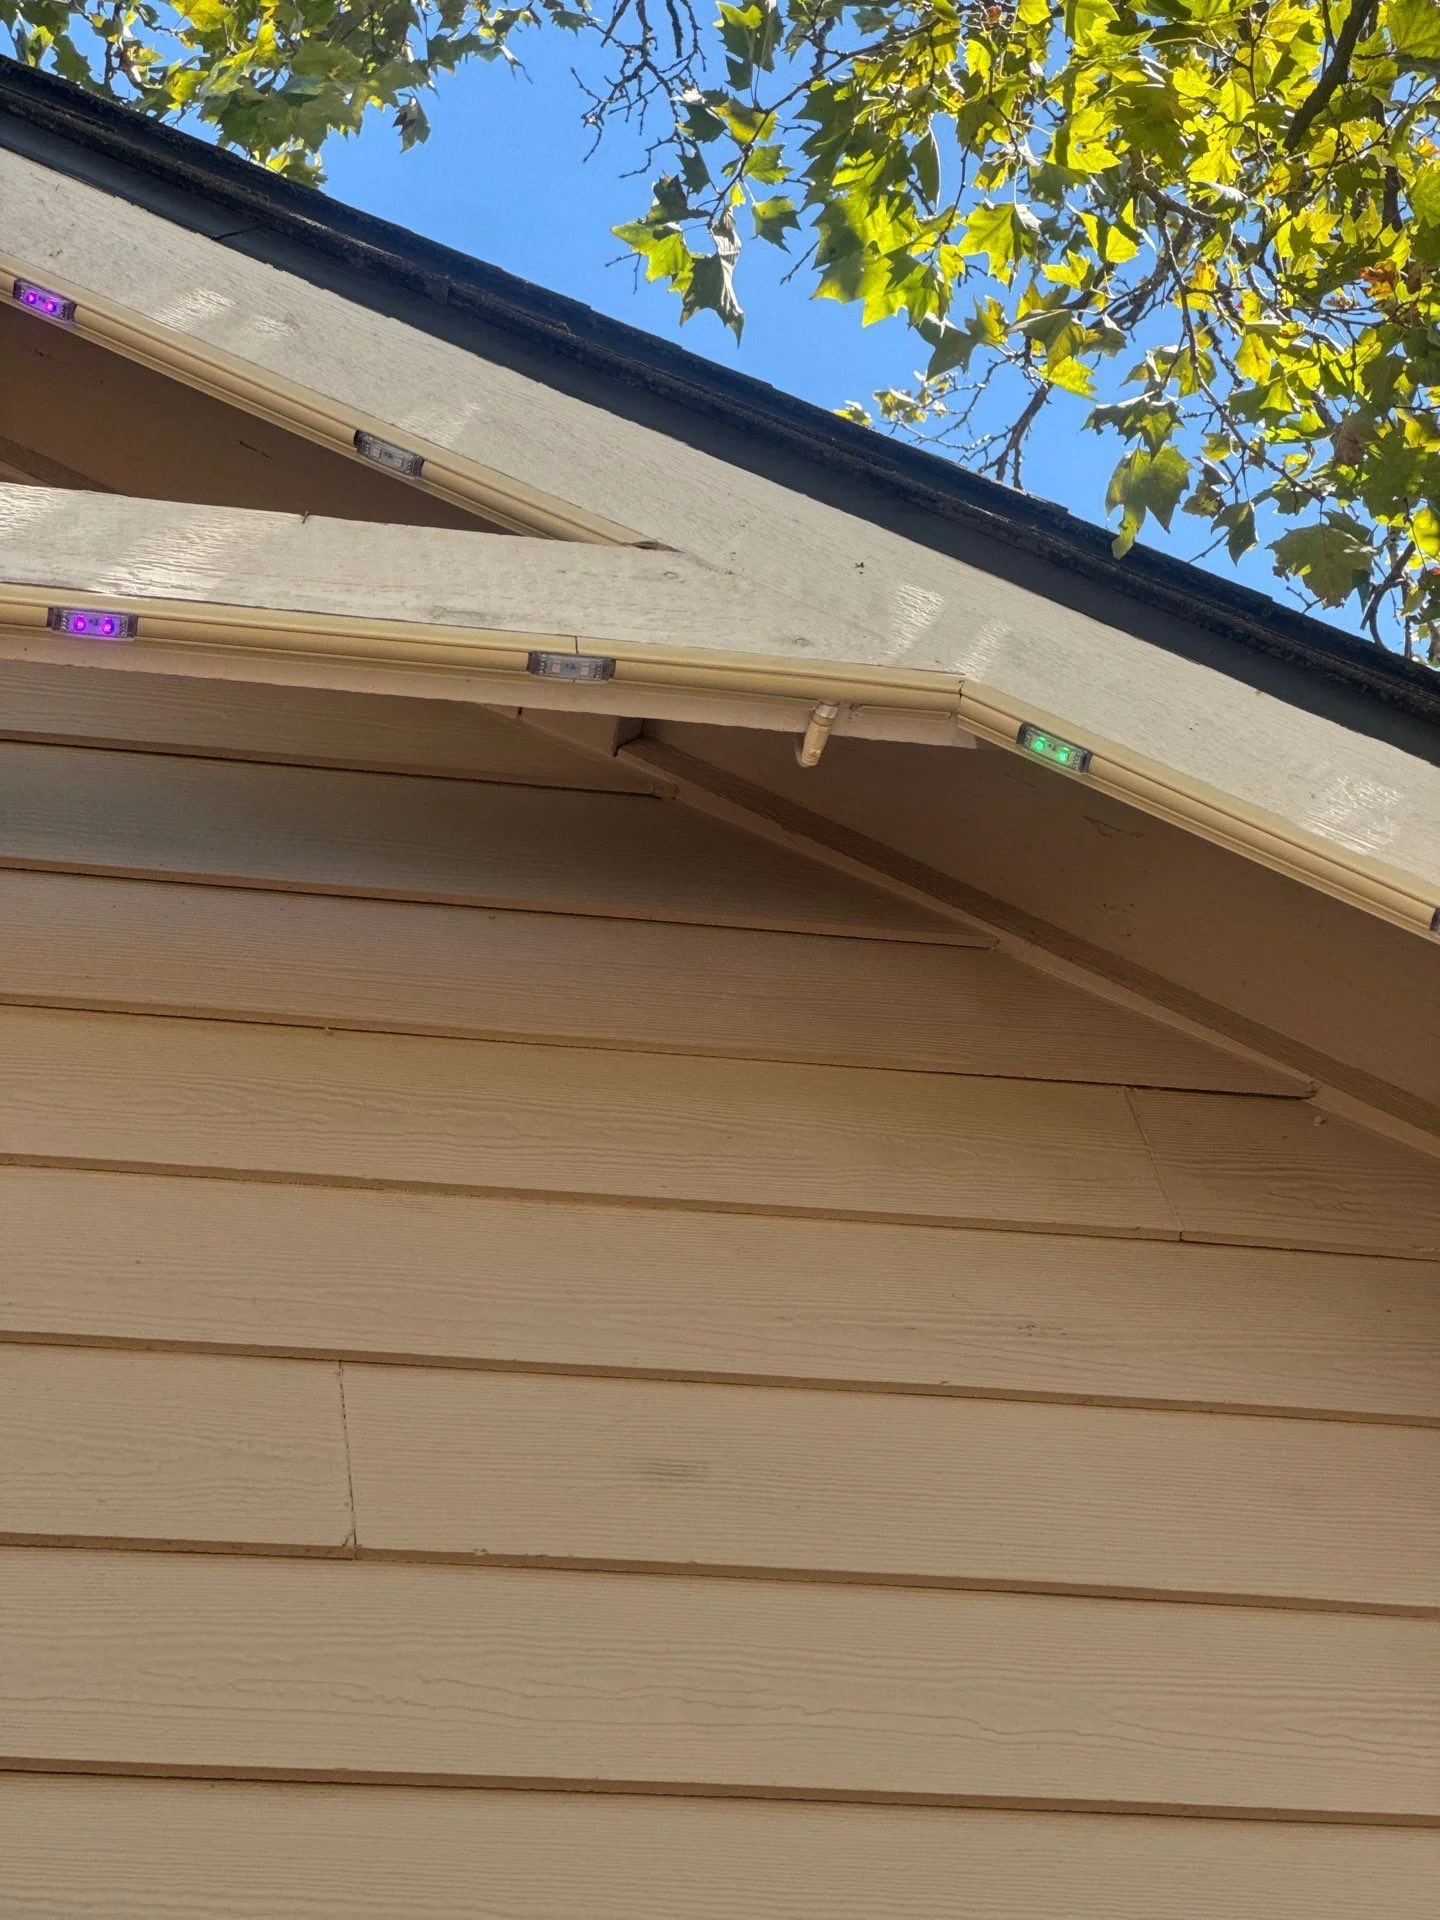
The track on this home is a light sand color, and in the close ups it reads as part of the trim. That was a deliberate choice. The gable trim is a warm cream, so a white track would have looked brighter than the surface it sits on, and a dark one would have outlined itself against it. Sand sits in between and disappears into the board it's mounted on.
We offer track in white, sand, light brown, dark brown, black, and gray, and the right one is whichever best matches the actual fascia and rake boards. On a craftsman home with white and cream trim, that usually means white or sand, and the call is made by holding the track up against the real surface in daylight.
- Match the board the track sits on. On the gables, that's the rake and fascia trim, not the siding behind it.
- Judge it in daylight. A cream that looks warm indoors can read quite differently in full sun, so we compare color outside.
- Expect the unlit track to be a thin line. The goal is for the channel to read as a shadow line or a trim detail, not as a fixture.
We go deeper on this in our guide to what permanent lights look like during the day.
How Power Reaches the Roofline
The marked up plan for this job is the most useful document we have from it, because it shows how a permanent system is actually put together. It reads like a small wiring diagram drawn on top of a photo of the house.
Everything starts at the control box. On this home, it's installed on the side of the house behind a cedar fence, where it's out of sight from the street and still easy for a technician to reach. From there, jumper cables run up the corner of the house, following the line of the downspout, to the roofline. At the eaves, the plan marks connection points where the cable meets the track. From those connections, the track carries the run along each rake, and at each gable a basic T splits the run so a second branch can feed the horizontal crossbar without needing another power source.
| Part of the system | What it does on this house |
|---|---|
| Control box | Installed behind the side fence, out of view from the street |
| Jumper cables | Run up the corner of the house along the downspout line to carry power and signal to the roof |
| Eave connections | Marked on the plan where the cable meets the track at the gutter line |
| Basic T connectors | One at each gable, splitting the run so the crossbar gets its own branch |
| Track and pebbles | The visible part, mounted along every rake and the gable framing |
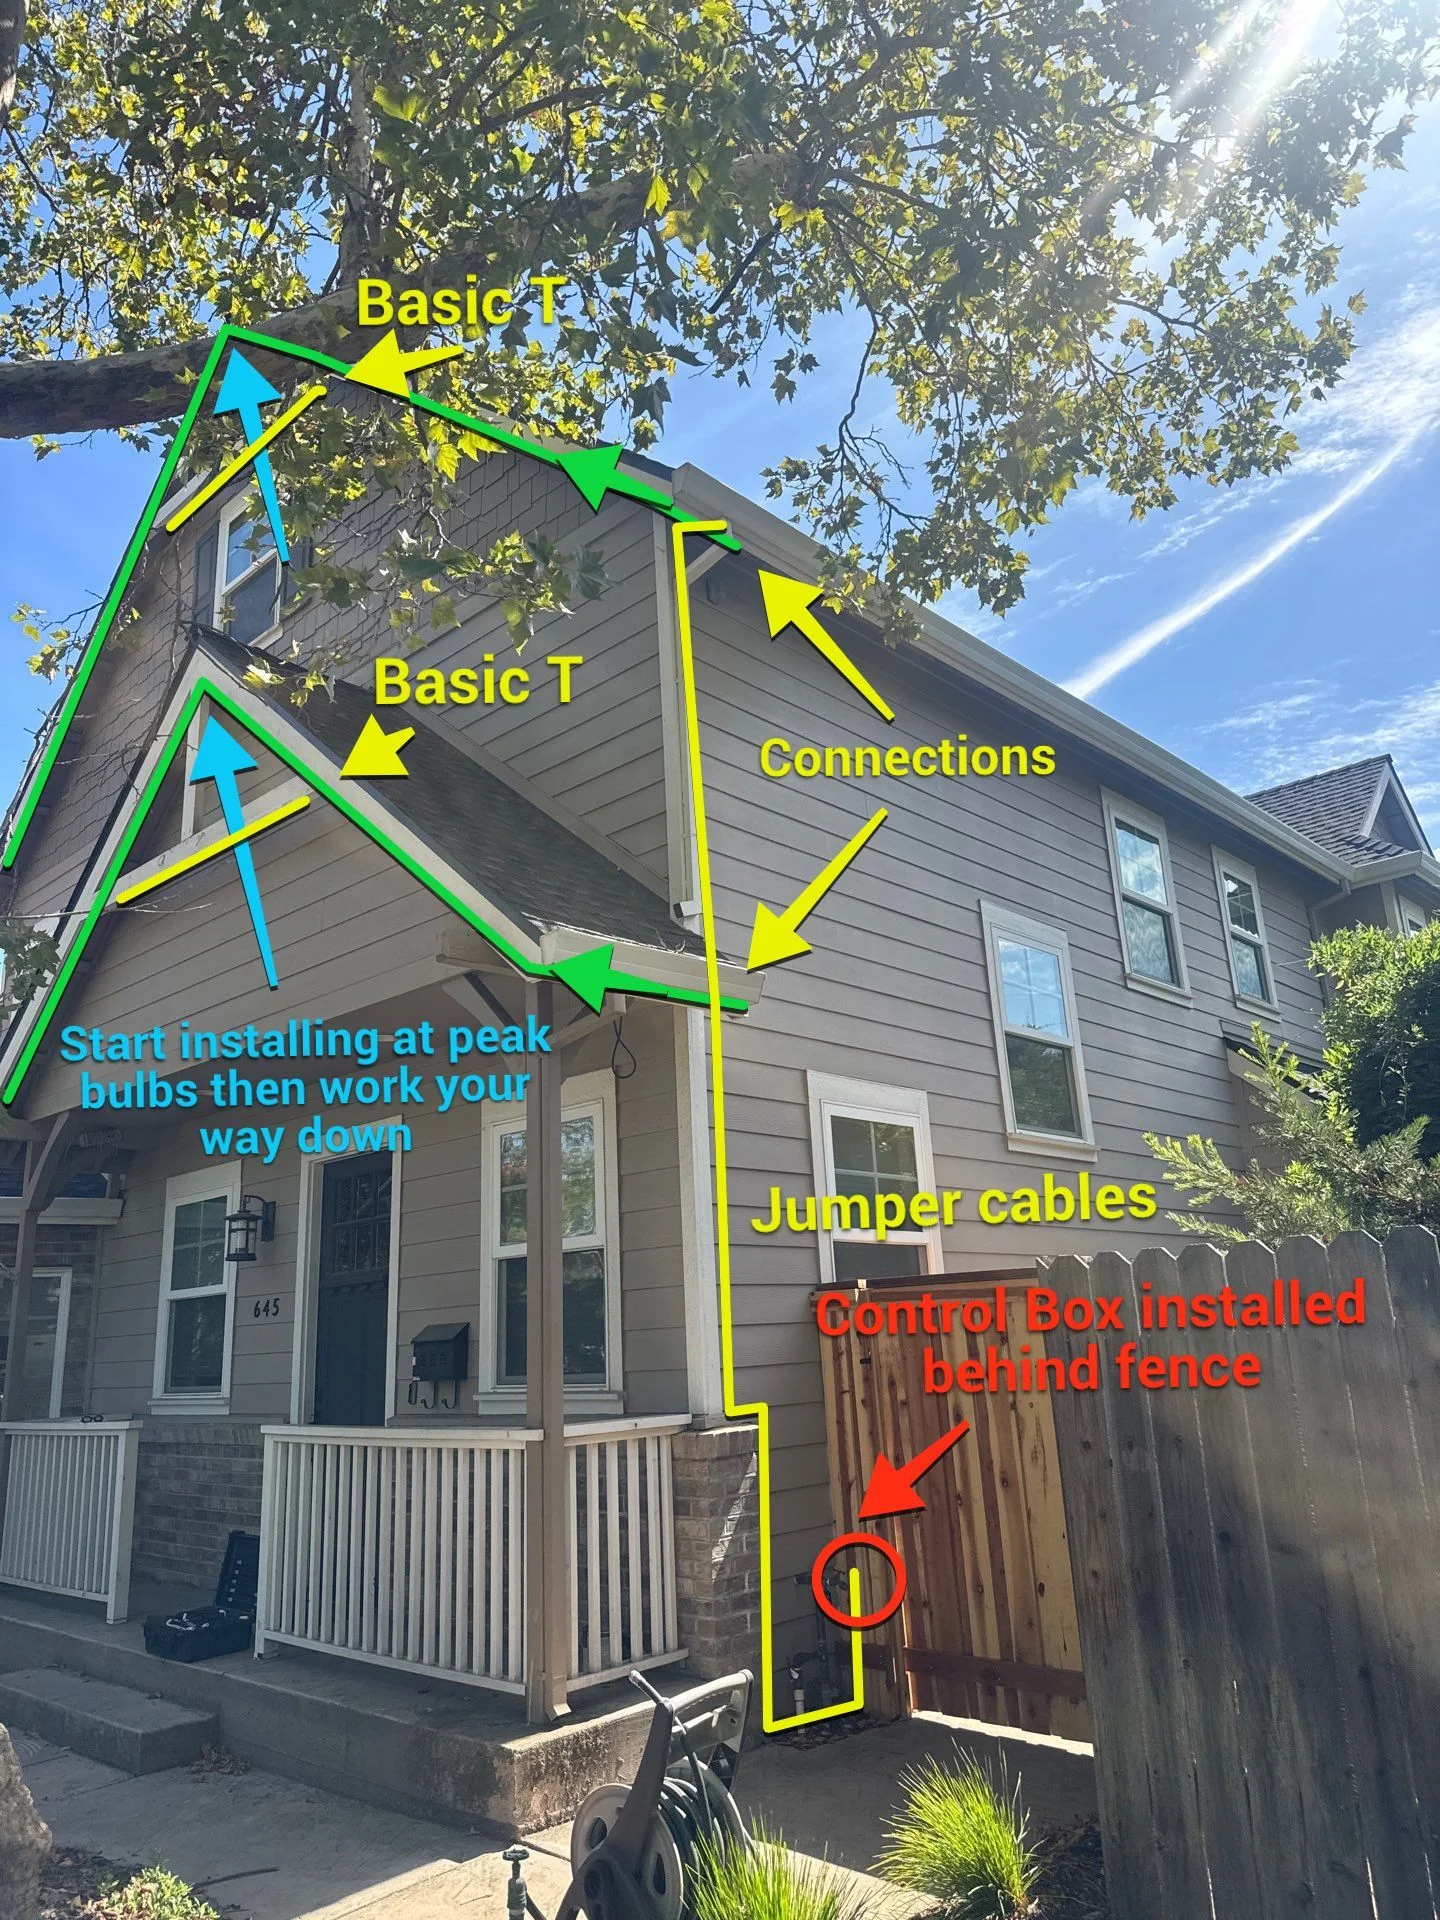
Planning the wiring this way is what keeps the finished roofline free of loose cables. Every connection has a deliberate location, usually at a corner or behind a downspout, and the run from the control box follows an edge that already exists on the house, so it reads as part of the structure.
Start at the Peaks and Work Down
Two notes on the plan are written directly to the crew: start with the peak bulbs on the right side, and start installing at the peak and work your way down. It's a small instruction with a good reason behind it.
- The peak sets the line. Everything else on a gable aligns to the apex, so getting it right first means the two rakes meet cleanly instead of overlapping or leaving a gap.
- Work down so you're always above finished work. Moving from the top down keeps the crew from leaning across track that's already in place.
- It matches how the wiring flows. The runs on this plan travel from the peak toward the eaves, so installing in that direction keeps the connections in order.
- It's the hardest part first. The peak is the most exposed and highest position, and it's easier to do while the crew is fresh and the lift is freshly set.
Want your roofline planned out before a single clip goes up?
Every install starts with a marked route, a power plan, and a start point.
Lighting the Architecture, Not Just the Edges
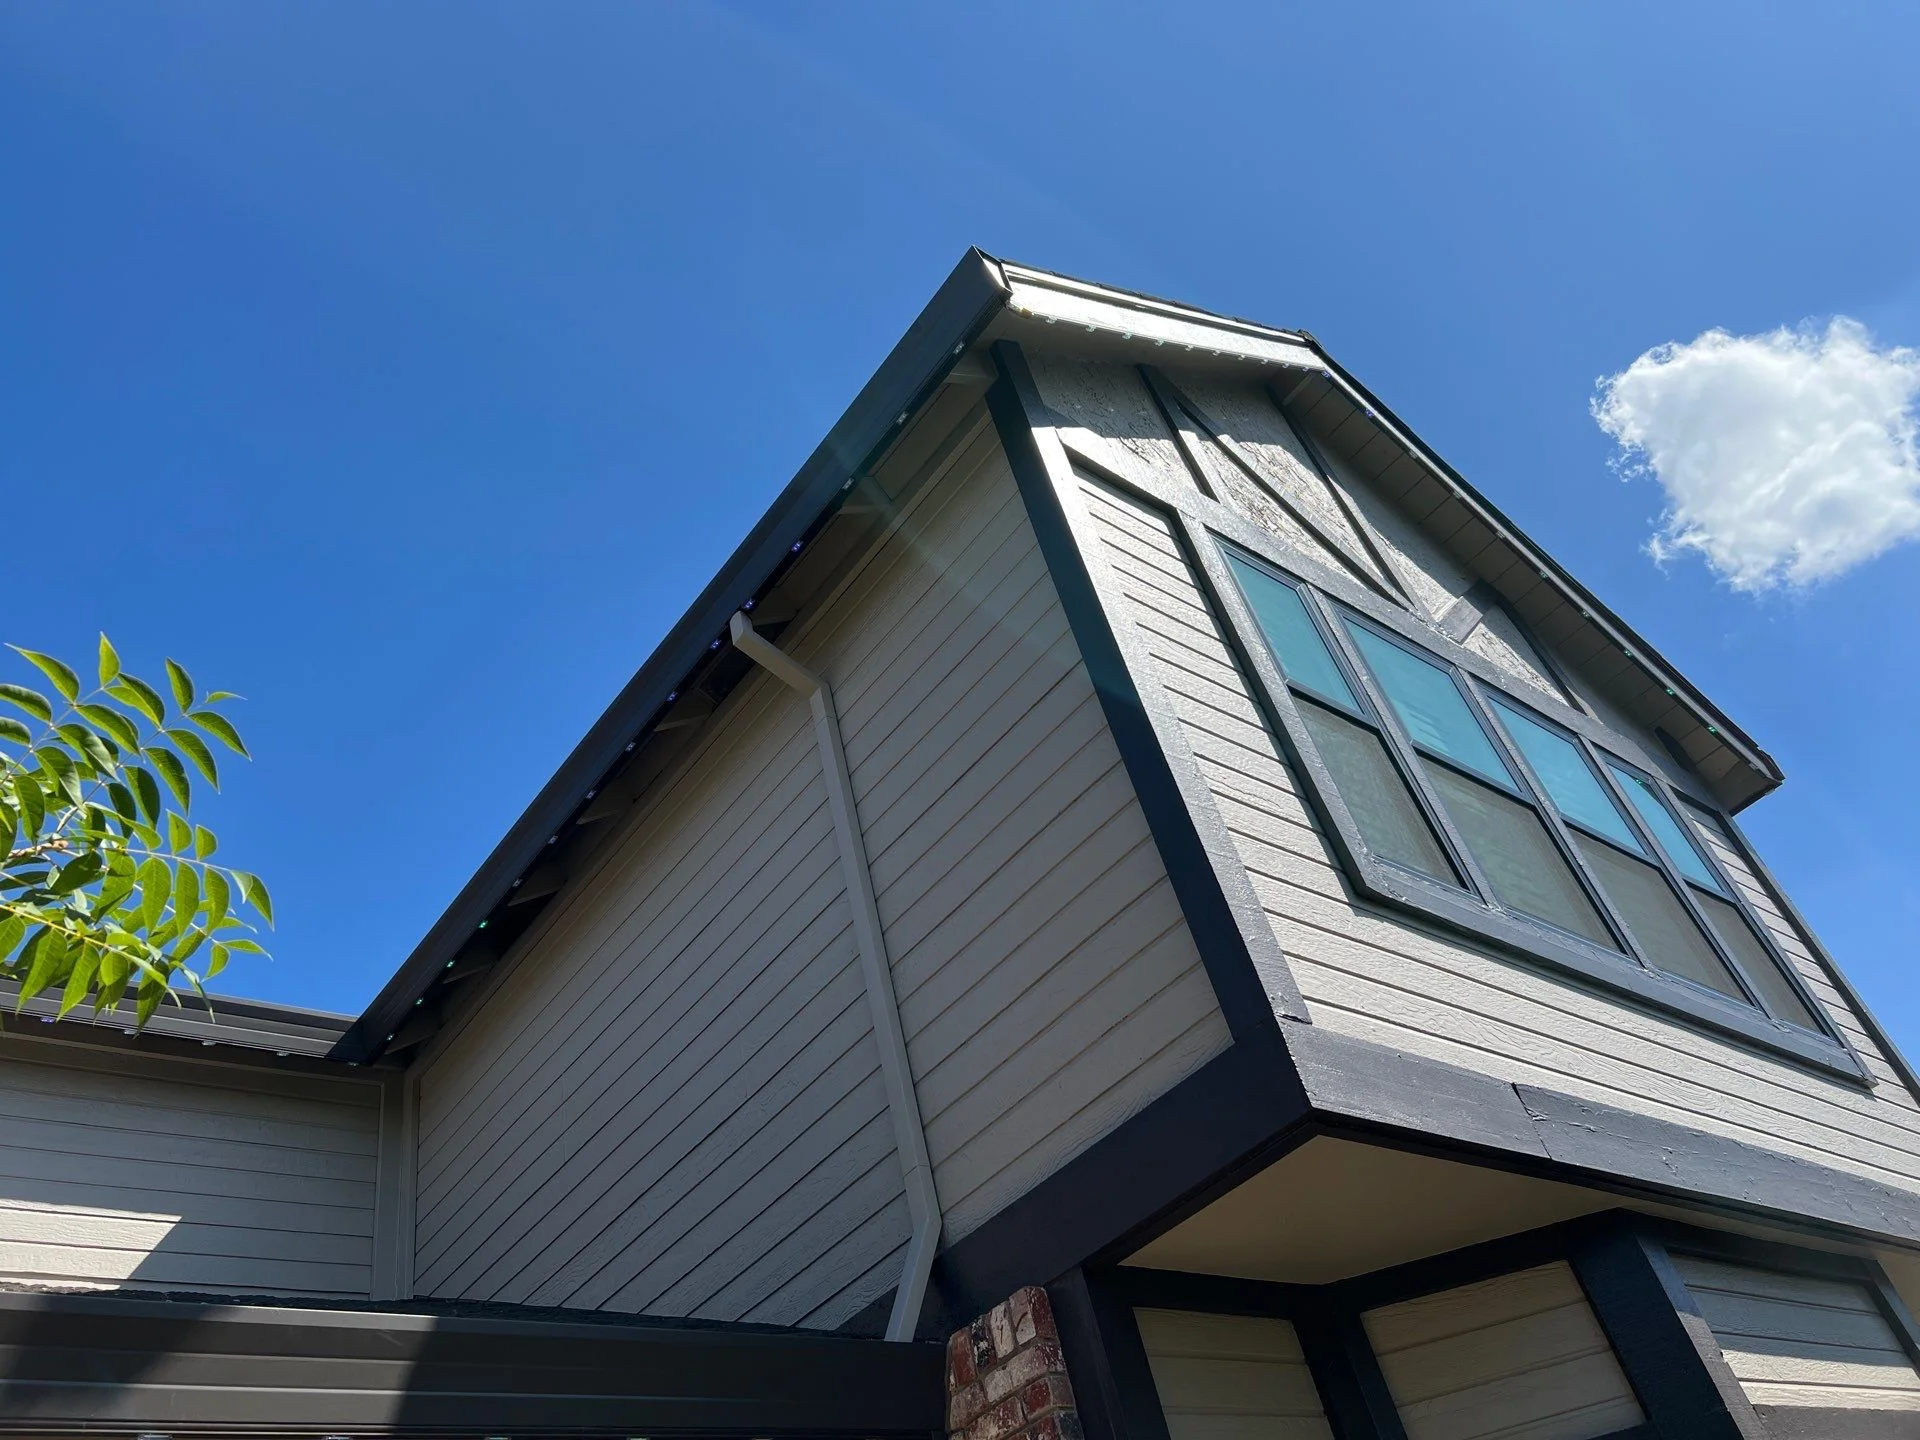
The most interesting choice on this house is what the plan treats as a line to be lit. It isn't only the outer edge of the roof. On both gables, the plan includes the horizontal crossbar, the decorative member that spans each gable face. In the close ups, you can see the track running along the underside of the rake boards and along that crossbar, with the pebbles set at regular intervals.
That detail matters. A plain outline of the roof makes the house look like a shape. Following the crossbar as well makes the house look like its own design, because the lighting is now highlighting the same framing the original builder chose to show off. It's the difference between a house that has lights on it and a house that's lit.
The Side Roofline
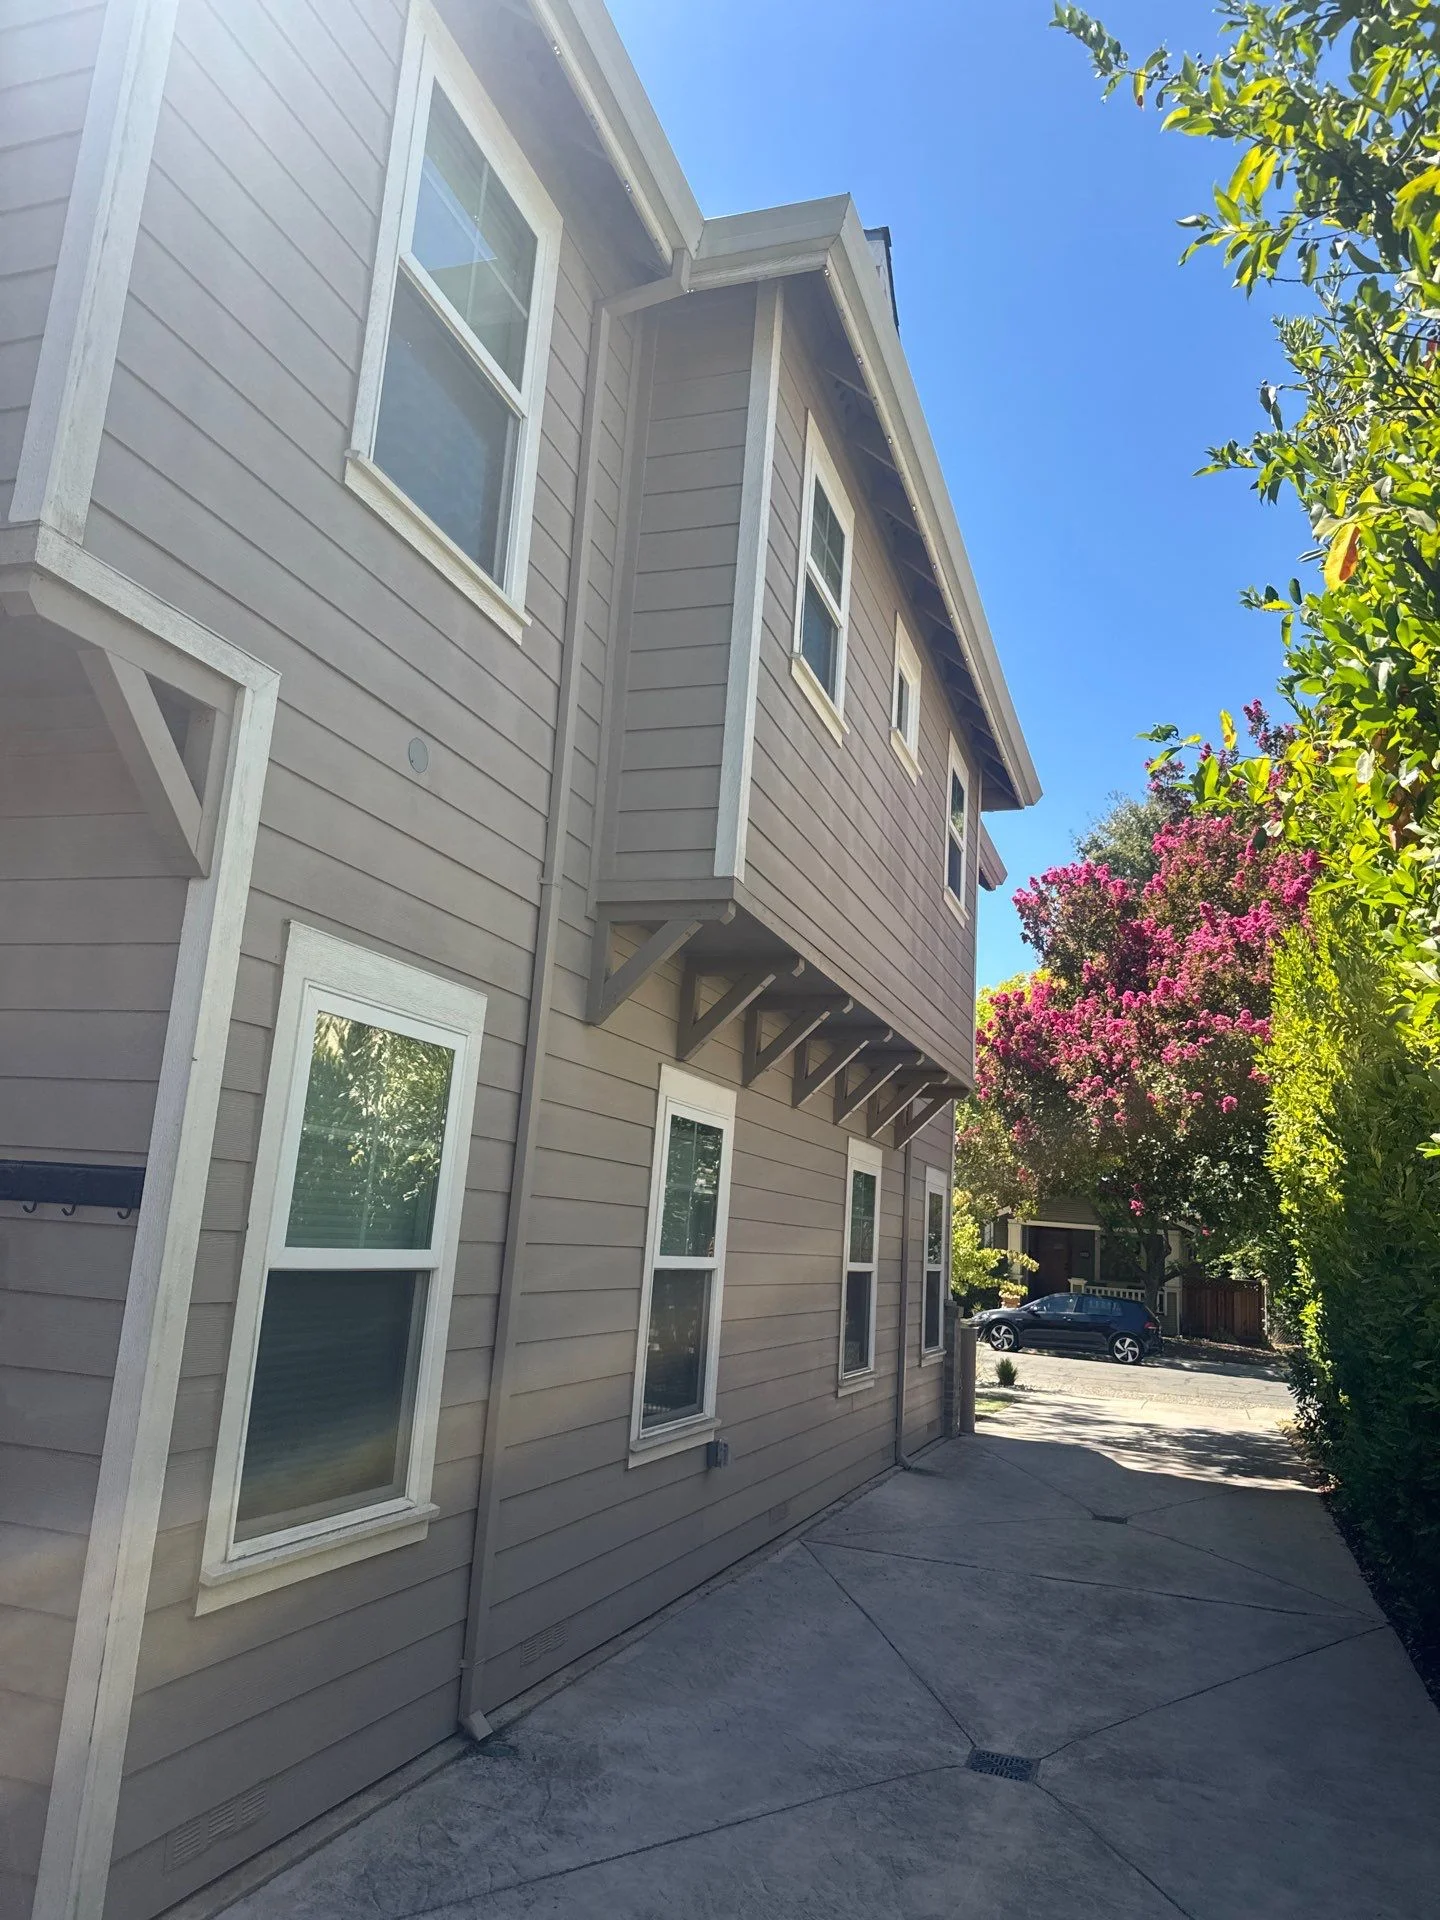
Around the side of the house, the route continues along a stepped roofline, tracing a rise, a drop, and another rise as the upper floor bumps out over its triangular wooden brackets. A short separate segment is marked at one end of that run. Planning it as one continuous path, with each step accounted for, is what keeps the side from looking like a different project than the front.
Why a Boom Lift Made Sense Here
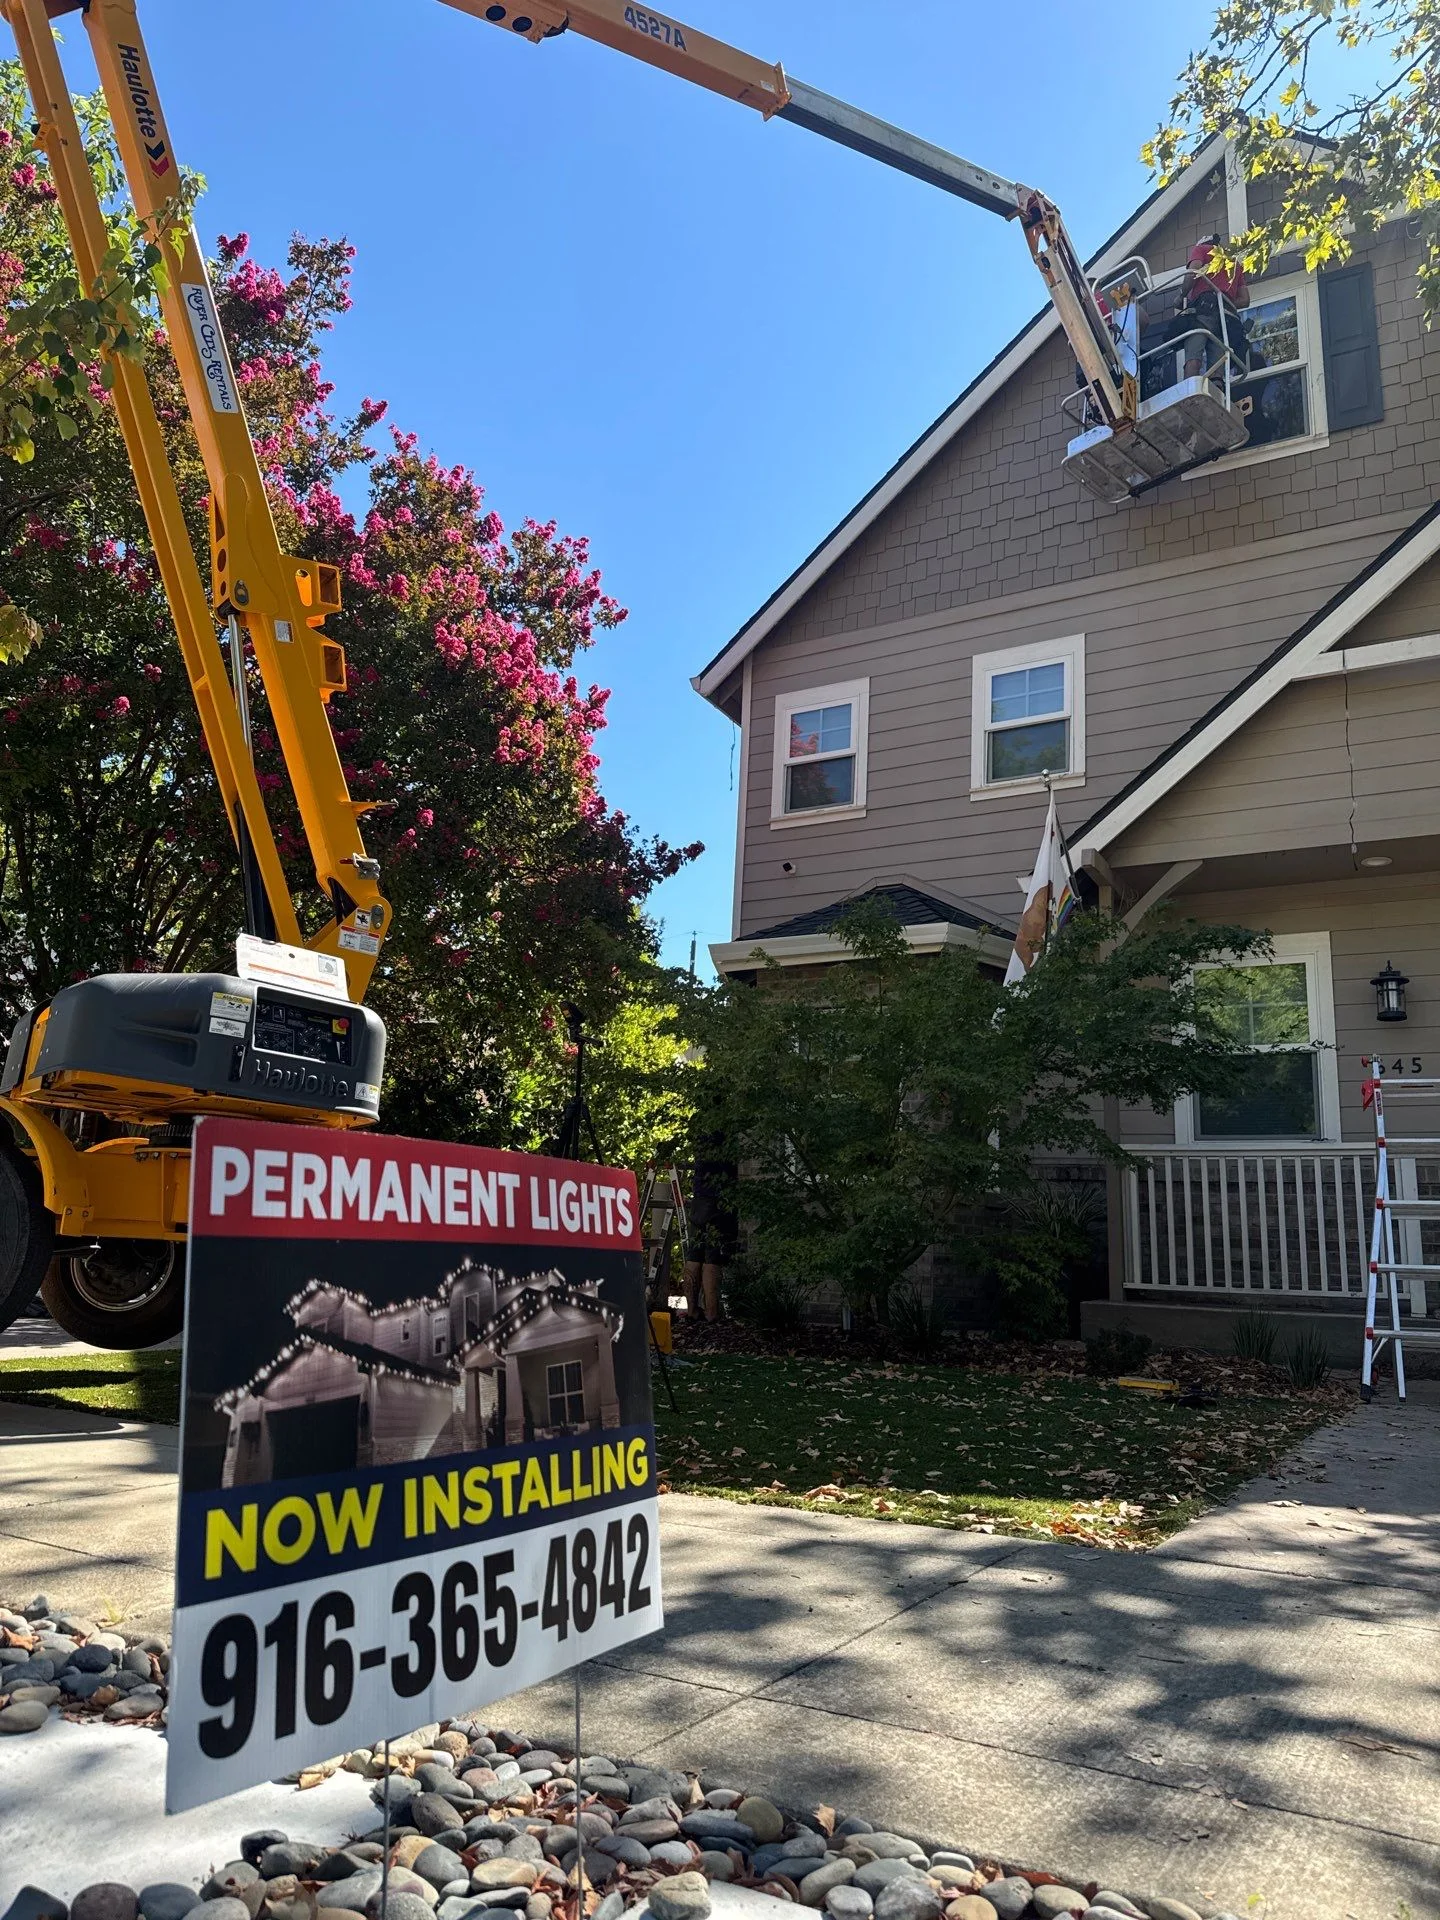
The documentation shows our crew working from the basket of a boom lift parked on the front lawn, reaching the tall main gable and its peak while a second ladder handles the lower sections near the porch. On a gable this tall, with a shade tree overhanging the front and landscaping close to the house, a lift is a safer way to reach the apex than leaning a ladder against the roof edge among the branches.
A boom lift also keeps the work accurate. The crew can hold position directly in front of the peak, with both hands free, and set the track and pebbles at the same spacing they'd use anywhere else on the roof. We cover the options for hard to reach sections in more detail in our post on when scaffolding or a lift is needed.
| Access method | Best for |
|---|---|
| Extension ladder | Standard rooflines and lower eaves with a clear landing spot |
| Multi position ladder | Porch roofs, bump outs, and sections near landscaping |
| Boom lift | Tall gables and peaks, especially with trees or landscaping in the way |
| Scaffolding | Large or complex sections that need a stable working platform for longer |
Working Under a Mature Shade Tree
One of the things people love about East Sacramento is the canopy, and that canopy is a real factor on a job like this one. A large shade tree sits in front of the house with limbs reaching toward the upper gable. It affects where a lift or ladder can be placed, how the crew moves around the front of the house, and how much clearance there is near the peak.
It also affects the house after the install. Mature trees drop leaves and seeds into gutters, and permanent lighting sits right at the roof edge, so keeping gutters clear is part of keeping the system looking good. If that sounds like your property, we've written about bundling gutter cleaning with a lighting install, since our sister company Dunzo Gutters can coordinate both.
Worth knowing: permanent track doesn't make gutter maintenance harder, but a clogged gutter right under a lit roofline is more noticeable than one hidden behind a plain edge. If your home sits under big trees, it's worth planning the two together.
What the Lit Close Ups Show
The close up photos were taken in full sun with the system running, and they show something that's easy to miss in a night photo: each pebble can be a different color. Along the same rake you can see purple, green, amber, and white lights sitting a few inches apart. That's an individually addressable system, which means every light is controlled on its own rather than the whole line showing one color at a time.
That's what makes effects possible, chasing colors, gradients, and patterns that move along the roofline. It's also what lets a homeowner switch from a calm warm white for everyday evenings to team colors on game day or a full holiday scene, all from an app. We explain how that works in our post on whether Christmas lights can change colors.
| Occasion | What a homeowner might run |
|---|---|
| Everyday evenings | A soft warm white that suits the home's character |
| Game day | Team colors on every gable, Kings purple and black for example |
| Holidays | Seasonal scenes without hanging a single strand |
| Parties and special occasions | Custom patterns and color effects from the app |
See permanent lighting on your own roofline first.
Try our AI Visualizer, completely free.
"Better than I could have ever expected. I had Santa's Lights install permanent lighting on my house, and the process was clear from start to finish."
Verified Google ReviewIs Permanent Lighting Right for a Craftsman Home?
Craftsman architecture is one of the better matches for permanent lighting. The defined trim, the visible gable framing, and the strong rooflines all give a track somewhere to sit and a shape to follow. A few questions help decide whether it's right for yours.
- Is your trim a consistent color? White, cream, and sand trims are straightforward to match.
- Do you have decorative framing worth highlighting? Crossbars, brackets, and exposed rafter tails give the lighting something to emphasize beyond the roof edge.
- Is your peak hard to reach? Tall gables are common on craftsman homes, and they may call for a lift. We plan for that during the consultation, not on install day.
- Do you want lights beyond December? Permanent lighting pays off when it's used across the year.
- Where would the control box live? A side yard, behind a fence or gate, keeps it out of view while staying accessible.
What It Costs
Permanent systems are priced by the length of track and the number of lights, so the number depends on your roofline. Our permanent lighting cost guide breaks down the typical ranges. Financing is available with a soft credit pull and monthly payments as low as $150, and when you book a permanent project of $4,000 or more, your Christmas lights are included free this year, a $799 value. You can see the current offer here. If you're still weighing it against seasonal lights, our honest comparison covers the tradeoffs.
FAQ: Permanent Lighting on Craftsman and Gabled Homes, Answered
Where does the control box go on a permanent lighting system?
Usually on the side of the house in a spot that's out of view but easy to reach for service. On this East Sacramento home, it's installed behind the side fence.
How does power get from the control box to the roofline?
Jumper cables run up an existing edge of the house, such as a corner or downspout line, to connection points at the eaves where they meet the track.
What is a basic T connector?
It's a connector that splits a run into a second branch, so one feed can serve both a gable's rakes and its horizontal crossbar without needing another power source.
Why do you start installing at the peak?
The peak sets the line everything else aligns to, working down keeps the crew above finished work, and it matches the direction the wiring runs on the plan.
Do you use a boom lift for tall gables?
When a peak is too tall or too obstructed for a ladder, yes. A lift lets the crew work accurately and safely directly in front of the peak.
Can each light be a different color?
Yes. The pebbles are individually addressable, so each one can show its own color, which is what allows effects and patterns along the roofline.
Do you install permanent lighting in East Sacramento?
Yes, East Sacramento is one of the Sacramento neighborhoods we serve, from older character homes to newer builds with craftsman detailing.
Most of what makes a permanent system look right happens where nobody's looking: the control box behind the fence, the cable running down the corner, the connection tucked at the eave. Plan those well, and what's left is a house that looks like itself, only lit.
Clark, Santa's Lights

Clark started Santa's Lights back in 2014 with a ladder, a truck, and way too much confidence in his own knot tying. Since then he's lit up thousands of homes across Sacramento, East Sacramento, Folsom, and beyond, and he still shows up to jobs himself often enough to know exactly what he's talking about. When he's not on a roofline, he's probably answering your call directly, because that's still how this business works.